
Pipes And Fittings
Pipes And Fittings
This is an excerpt from the Book called “Stanley Complete Baths” by Des Moines, Lowa. Continue reading to learn more about Pipes And Fittings, thanks to the author.
When you install new fixtures, you’ll need to know what kind of pipe to use and what size it is. Newer homes usually have drainpipes made of some kind of plastic and supply pipes made of copper; a pre-1950 home may have cast-iron drainpipes and galvanized steel water supply pipes.
Plastic
Plastic pipe is inexpensive and easy to work with, making it popular among installers. Joints are glued together using a primer that cleans the surfaces and a cement that bonds them securely. There are four different kinds of plastic used in residential plumbing.
White or cream-color PVC (polyvinyl chloride) pipe is the most common choice for drainpipes. It’s strong, lasts nearly forever, and is almost completely impervious to chemicals. PVC is sometimes used for supply pipes, but codes in most communities no longer allow it for hot water lines. That’s because heat shrinks it and weakens the joints. To find out the strength (or “schedule”) of a PVC pipe, look for stamped printing on it. In most localities schedule 40 is considered strong enough for residential purposes.
CPVC (chlorinated polyvinyl chloride) pipe has the strength of PVC and is also heat-resistant, so many (but not all) codes allow its use for interior supply lines.
Black ABS (acrylonitrile butadiene styrene) drainpipe was the first plastic pipe to be used in homes. Most localities no longer permit its use because it deteriorates rapidly. PVC is considered a superior material.
Flexible PE (polyethylene) supply pipe is the newest kind of plastic pipe, but many codes restrict its use. PEX (cross-linked polyethylene) is stronger and can handle hot as well as cold water.
Copper
Copper pipe is long-lasting and resists corrosion, making it ideal for water supply pipes. It is more expensive than plastic but still reasonably priced.
Rigid copper pipe comes in three thicknesses. The thinnest, rated “M,” is considered by most local codes to be strong enough for residential purposes. Thicker pipes, rated “L” or “K,” are used outdoors. To join rigid copper pipe, you “sweat” the joint-heat it with a propane torch until molten solder flows freely into the joint.
Flexible copper tubing is used primarily to supply water to appliances. You’ll find small-diameter tubing carrying water to an ice maker. Larger tubing supplies a dishwasher. The tubing is easily bent to make fairly tight turns. If it gets kinked, however, there’s no way to fix it; the piece must be replaced. It is joined to fittings and valves using compression fittings.
Steel
Many older homes have galvanized steel pipes for supply lines, and sometimes for branch drain lines as well. It has a dull gray color. Galvanized pipe is strong-a nail has a hard time piercing it-but its useful life is only 50 years or so. Joints develop rust and, more importantly, the galvanized surfaces attract minerals and cause them to build up in the pipe. The minerals clog the pipe, restricting the flow of water. Galvanized drainpipe rarely gets clogged enough to stop water flowing, but the joints may rust and leak.
Black steel pipe is used for gas lines only. It should not be used for water supply lines because it rusts quickly. (An exception: In some areas black steel is allowed for lines that supply a boiler that heats the house.) Yellow-coated black pipe is used for underground gas lines.
To join steel pipe you must first wrap the threads with white teflon tape (yellow for gas pipes) or brush them with pipe dope (a thick sealant that may be gray, white, or yellow), then tighten it. The joints must be very tight so they cannot be loosened without a long pipe wrench. Inadequately tightened joints will leak eventually.
Cast iron
Used only for drain lines and vents, cast-iron pipe is heavy and strong. Many people prefer it over plastic drainpipe because cast iron deadens the sound of running water, while plastic seems to amplify it.
Cast iron can last for more than a hundred years. However, it’s not unusual for one or two sections to rust through while the rest of the pipe remains in good shape.
Traditionally cast-iron pipe is joined by first stuffing oakum (a loose rope of greasy fiber) into the recess of one pipe, fitting in the end of the next pipe, then pouring molten lead into the recess. Newer “no-hub” fittings employ a neoprene sleeve whose edges are sealed tight against the pipe with clamps.
Fittings
Whenever pipe turns a corner or branches off, a fitting is required. Elbows (or “els”) make 90-or 45-degree turns. Tees and Ys are used where pipes branch off. Couplings join two pipes together.
Transition Fittings
When changing from one pipe material to another, transition fittings are used. A steel-to-copper transition will corrode quickly unless a dielectric fitting is used-it has a plastic washer that separates the metals. Other transition fittings join copper to plastic, plastic to steel, and plastic to cast iron.
Stanley Pro Tip
Measuring Pipe
To determine the size of a pipe, wrap a piece of tape or a strip of paper-something that will not stretch-around it. Make a mark to indicate the outside circumference of the pipe. Consult the chart opposite to find the inside diameter of the pipe.
Standard Diameters
Supply pipes usually have an inside diameter of ½ inch, ¾ inch, or 1 inch. Drainpipe generally ranges in size from 1 ½ inches to 4 inches.
Working With Copper Pipe
A properly soldered (or “sweated”) pipe joint is as strong as the pipe itself. A poorly soldered joint will leak. It might not leak until the next day, or in a year or two, but it will leak. It might not leak until the next day, or in a year or two, but it will leak.
The key to making a strong joint is to work systematically. You must cut the pipe square and remove all the burrs. The inside of the fitting and the outside of the pipe must be sanded to a shine. Flux must be applied to both surfaces or the solder won’t adhere. Then you must heat the pipe evenly so the solder will be fully drawn into the joint. Even wiping is essential-a droplet of solder can weaken a joint.
Keep It Round
Pipe ends and fittings must be perfectly round. If it’s dented even slightly you can’t restore it to its original shape. Cut the pipe again or buy a new fitting.
Cutting with a tubing cutter ensures roundness. If space is tight and you must cut with a hacksaw, do it slowly and gently. If you must bend a pipe to move it away from a wall, work carefully.
- Hold the pipe against the fitting to mark the cut or measure its length with a tape measure. Be sure to include the distance the pipe will travel into the fitting. Mark the cut with a felt-tipped marker.
- Use as large a tubing cutter as space permits. Line up the cutting wheel on your mark. Twist the knob until the wheel starts to bite into the pipe. Rotate the cutter once around the pipe, tighten a half turn or so, and repeat until the pipe is cut. Assemble all the parts of a joint in a dry run.
- Using a wire brush equal to the size of the fitting, ream out every inside opening until it is shiny. Even oil from your hand may weaken the joint. If you accidentally touch a brushed opening, ream it again.

- Insert the pipe in the multiuse brush and spin the brush a few times until the pipe’s outside surface shines. As an alternative brighten the surface with emery cloth or a flexible sanding material. Rebrush or resand if you touch the shiny area.
- Using a flux brush (available with the flux or sold separately at your home center), apply flux to all inside openings of the fitting and to the outside of the pipe. Take care to keep the flux brush away from any debris; clean it if any particles stick to it.
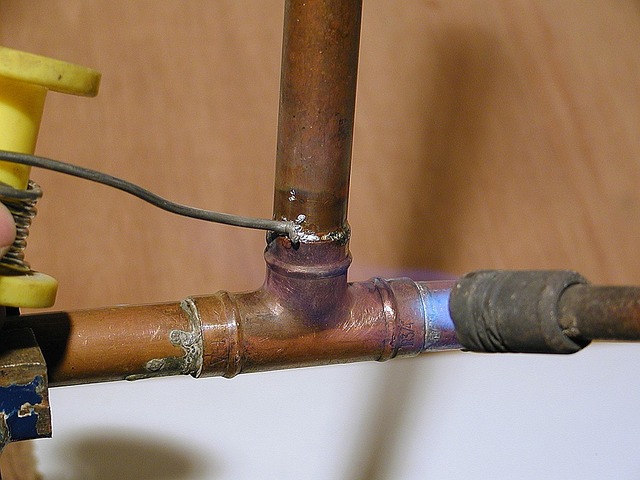
- Light your propane torch and point the flame at the fitting-not at the pipe not on the joint itself. The tip of the blue portion of the flame should just touch the fitting. Move the flame back and forth so you heat two opposite sides of the fitting.
- When the fitting starts to smoke, remove the flame and touch the tip of the solder to the joint. If it does not melt, heat again. Once the fitting is hot enough, the solder will be drawn into the joint. Move the solder around so the entire joint fills with solder.
- Immediately repeat the process for any other joints in the fitting. This will go quickly because the fitting is already hot. Once all the joints are soldered, quickly wipe all the joints with a damp rag. Avoid bumping the fitting for 10 to 15 minutes.
Prestart Checklist
Time
About 15 minutes to cut a pipe and join a fitting
Tools
Tubing cutter or hacksaw, multiuse wire brush, propane torch (preferably with a trigger igniter), flux brush, groove-joint pliers, flame guard
Skills
Cutting pipe, soldering
Prep
Protect any flammable surfaces with a fiber shield or a cookie sheet
Materials
Copper pipe and fittings, flux, solder (95 percent tin for drinking water supply), damp rag
Sweating A Brass Valve
If a valve has any plastic parts-as is the case with most valves-disassemble the valve and remove all the meltable parts. Heat the brass valve body as you would a fitting. After sweating the joint, wait for the valve to cool before replacing the plastic parts.
Stanley Pro Tip
Protect Walls And Framing From The Torch Flame
While caught up sweating a copper joint, you may not notice that the flame is charring a joist or wall surface. Protect flammable surfaces with a fiber shield or use an old cookie sheet. Keep a home fire extinguisher handy.
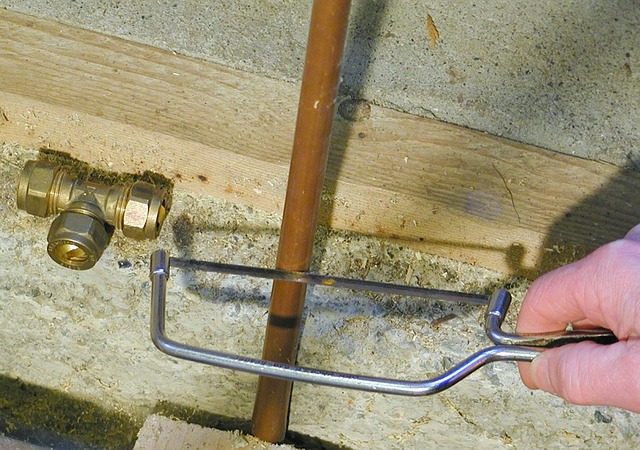
If you can’t pull a pipe more than a half inch away from a wall or framing member, don’t worry about heating all around the fitting. As long as you heat two opposite sides, the solder will draw evenly around the joint.
Avoid MAPP gas, an alternative to propane fuel. It produces an extremely hot flame and is not recommended for most residential work.
After the job is complete, check the area an hour later to be sure no flammable surfaces are smoldering.